Mardi Gras is just around the corner, and what better way to celebrate than by having your children create their own festive Mardi Gras mask? With just a few Dollar Tree craft supplies and a little creativity, they can design a unique and colorful mask perfect for parades, parties, or classroom activities.
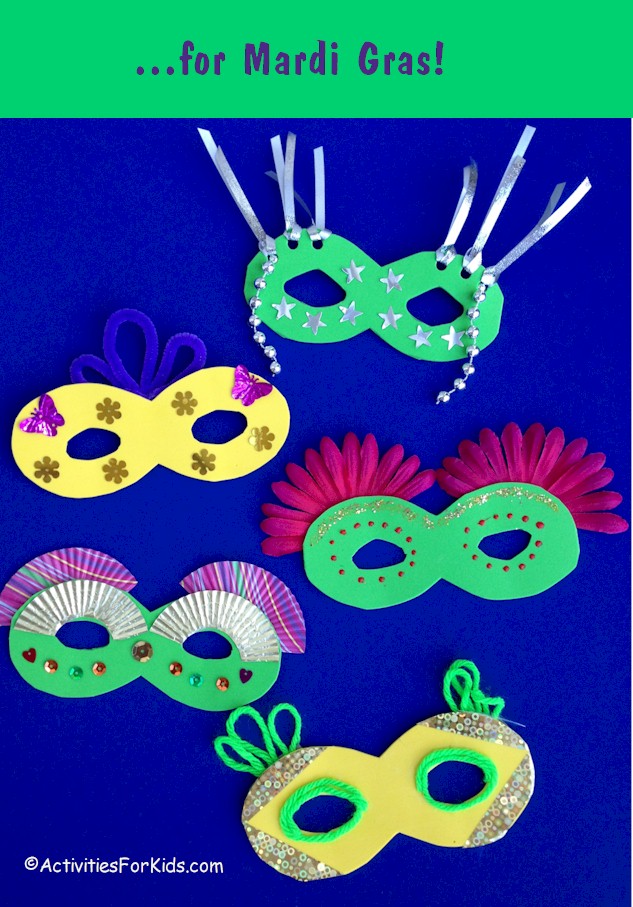
I challenged myself to make seven Mardi Gras masks using 14 different craft supplies from Dollar Tree—and the results were festive and fun! Below, I’ll share step-by-step instructions on how to craft your own Mardi Gras mask, along with decoration ideas to inspire your creativity.
🎭 Laissez les bons temps rouler! (Let the good times roll!)
Basic Supplies You’ll Need
- Printable Mardi Gras mask template (Two sizes are available)
- Craft foam sheets (Purple, Green, and Gold—traditional Mardi Gras colors)
- Scissors
- Ribbon or elastic (to secure the mask)
- Hole punch (optional, for ribbon attachment)
- Glue gun (optional, for heavier decorations)
- Duct tape
- Glue pen
Other Dollar Store items to consider for making a creative and unique mask:
Pipe cleaners, Metallic ribbon, Yarn, Glitter Glue Tubes, Mardi Gras beads, Sequins, Feathers, Reflector tape Foil stars, Silk Flowers, Chenille Stems, Foil and decorated cupcake liners.
Step 1: Create the Basic Mask
- Print the Mardi Gras mask template. Each page includes two mask sizes—choose the larger one for more decorating space.
- Trace the mask template onto craft foam in your desired color (purple, green, or yellow).
- Cut out the mask shape. Carefully trim around the eye holes.
- Punch holes on the sides of the mask if you plan to use ribbon or elastic for wearing. Alternatively, attach a sturdy plastic straw for a handheld masquerade mask.
Step 2: Decorating Ideas for Your Mardi Gras Mask
Green Mask with Stars
Punch three holes above each eye using a hole punch.
Thread 6-inch folded metallic ribbon through each hole.
Secure a single Mardi Gras bead to the holes at the edges for extra flair.
Yellow Mask with Butterflies
Decorate the mask with butterfly and flower sequins.
Create a crown effect by folding a purple chenille stem into shape and securing it with duct tape on the back.
Green Mask with Red Flowers (My Favorite!)
Instead of using feathers, dismantle a silk flower (like a Gerbera daisy) and attach sections to the mask using a glue gun.
Add puff paint accents and outline the top of the mask with glitter glue for a shimmering effect.
Green Mask with Cupcake Liners
Cut sections of metallic and colorful cupcake liners to create a textured design.
Use a glue pen to attach them securely to the mask.
Outline the bottom with matching sequins for extra sparkle.
Yellow Mask with Green Yarn
Use a glue gun to attach yarn around the eye area for a bold design.
Take a 10-inch section of yarn, make three loops, and secure it to the back of the mask with duct tape.
Attach gold reflector tape along the edges and trim it to match the shape of the mask
[AFKpin]

A Few Other Options:
Purple mask with Feathers
Outline the mask and eye area with puff paint.
Use scraps of yellow craft foam for the diamond shapes, giving it a bit of a jester look.
Attach a few coordinating feather sections on the sides.
Purple mask with craft foam triangles
This is a great way to use up leftover scraps of the foam. For a little extra piazza, take two frilly party picks and cut off the ends so that there is only about 1″ of the wooden pick. Use duct tape to attach the party picks to the back of the mask.
Final Thoughts
Creating a Mardi Gras mask is not only a fun and budget-friendly activity, but it also allows kids to express their creativity. Whether you’re decorating masks for a Mardi Gras party, classroom craft, or parade celebration, these DIY Mardi Gras mask ideas are easy to follow and incredibly fun to make!